This project is a continuation of my recent idea to remake and upcycle those earlier garments that I did not get to love or wear much. It is hopefully a coincidence that I’ve recently upcycled jumpsuits – I hope the time will come for new jumpsuits to get made and loved. This time around I’ve cut to pieces so meticulously made Obsessive check jumpsuit from two years ago.

This jumpsuit was a tricky and elaborate project, I was very proud of it at the time! It was my first project where I had to do a lot of check matching. Those checks are rectangular instead of being square, and also color sequence of vertical stripes is irregular. It made for a truly obsessive check matching back then, and now I had to repeat the exercise again! I definitely hope that it was worth it, and that my new skirt will get much more wearing this autumn than the initial jumpsuit did!
There were few reasons why I did not get to love this jumpsuit all that much. First of all, making a jumpsuit out of fabric meant for jackets and coats is not an overly great idea. This Yorkshire wool is some 300+ GSM animal, clearly too heavy for a jumpsuit and also too rough for an unlined garment. In the process of making the jumpsuit I had realized that this wool felt scratchy against my skin, so I ended up lining bodice and sleeves. But unlined pants were rough enough for my legs even through stockings. So yeah, little pleasure really. Another challenge was too narrow sleeves that did not feel too comfortable. And overall I felt a bit weird in those checks from head to toe. And so a bit reluctantly, I decided to repurpose the jumpsuit and make a new and hopefully more wearable garment out of it.
Interestingly enough, I do not wear skirts all that much and up until now I haven’t found a good enough reason to make skirts. That is, until now! This time around it was clearly a skirt that I knew I would have enough fabric for. And so the skirt it is!


When I made a decision to subject my jumpsuit for remaking, I had to consider carefully if I’d manage to have enough of width of fabric for the skirt. At first I was thinking about a pencil skirt, however it was quite uncertain, how long a skirt of full width I’d be able to squeeze out of those wide pants. I prepared mentally to make a skirt with a center front as well as back seam, if need be, and finally made up my mind to cut the jumpsuit to pieces. I knew that I needed to save every centimeter of fabric width, so those wide pants were all unpicked as well as their hem. The only part that got cut was waist seam. In addition to that, I had to unpick all the pleats of pants, and that was necessary for me to have four flat and (hopefully) wide enough fabric sheets to try and fit my skirt pieces on.
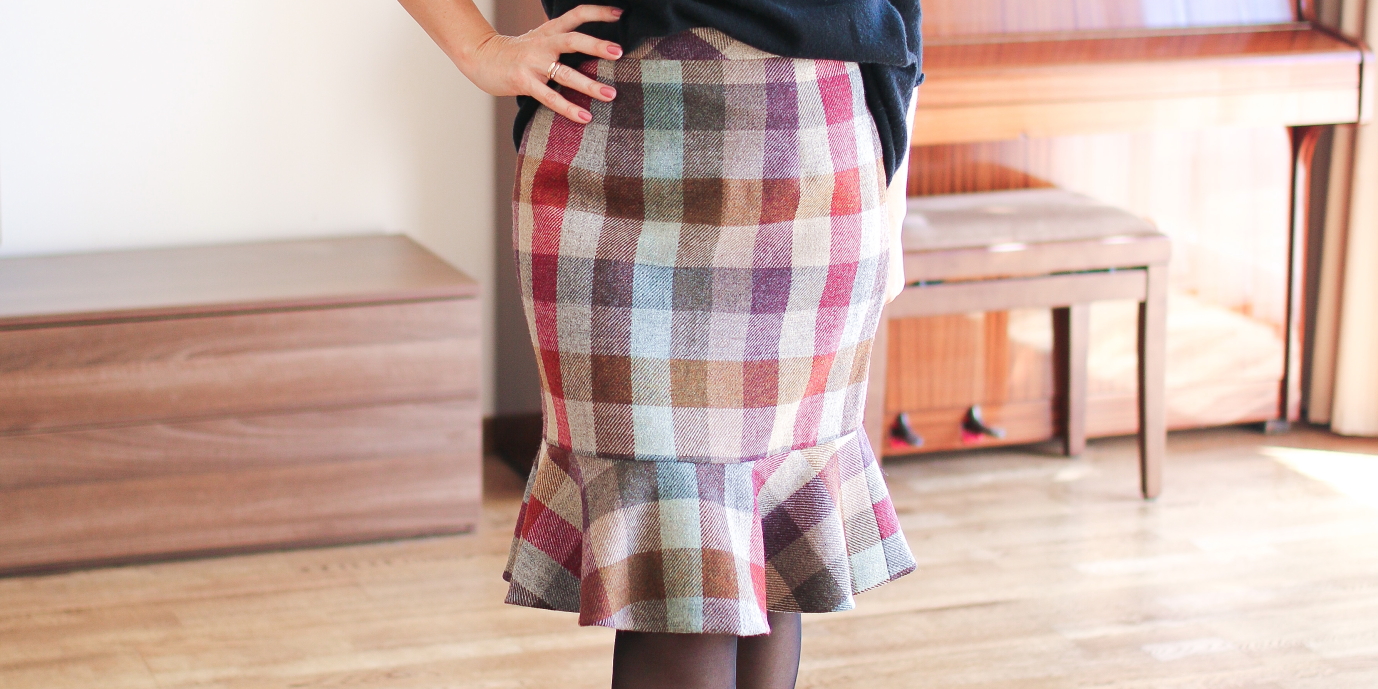
My task complexity was amplified by the fact, that again I had to take into consideration checks matching. I did not like that long and very conspicuous red stripe going though the entire center front of the jumpsuit (and center back, for that matter). Actually, it had been quite a feat to make it back then, but it did not make for a very appealing result. So this time I decided to de-center red stripes, and I think now they are not as overwhelming, and the skirt colors look much more balanced.
The flounce here is full circle flounce. I did not have enough fabric for two half-circle flounces. I was happy to squeeze out the front flounce as a continuous piece, whereas the back flounce was made out of two pieces stitched at the center back. Checks of flounce pieces are also matched across side seams – visible in the left picture below. And my main consideration in the process was whether or not to leave that narrow darker line right above the flounce. There I actually miscalculated a bit. That dark line was supposed to go into seam allowance, so that when I attached the flounce, the main skirt would end with a lighter horizontal stripe. While learning to match stripes and checks I’d been given a valuable advice by one of my sewing friends, that hems should end with lighter stripe – visually it is more appealing. When I attached the flounce, I realized that seam allowance of the main skirt had been too wide, therefore that darker narrow stripe was still showing up. I could have fixed this – ripped the flounce off the skirt and sewed it back on with wider seam allowance. However, after looking at myself wearing the skirt for some time, I realized that I quite liked how that narrow dark stripe works as a border between the main skirt and the flounce, and decided to leave it as it was. All in all, nothing is unintentional with checks placement in this skirt!


Up until late in the process I was unsure if I was going to leave the skirt as it was, or I would need to install a waistband. The blocks I was using for this skirt came from McCall’s M7994 dress pattern that I used to make my Fancy teal dress. I ended up redrawing pattern blocks in order to take into account all the adjustments that were needed for that pattern to work. And of course there was no waistband as part of that pattern. However, eventually it occured to me that this skirt needed a waistband. So I ended up cutting few 9 cm wide strips on bias, interfacing them and installing a waistband. I do not quite like how that straight waistband works unfortunately. If I ever make any other skirt, I should use a proper convex waistband to avoid waistband gaping. In this case, I believe gaping is also caused by the fact that straight waistband was cut on bias and folded in half lengthwise. I saw this problem emerging quite early in the process. But first, I wanted the waistband to be cut on bias to break fabric pattern somewhat. And also, I had already had enough of seam ripping in this project to want even more seam ripping while redoing the waistband. So eventually I decided to leave that sub-optimal waistband as it was, especially as this skirt is intended to be worn with sweaters, so the waistband would not be visible really.
Talking about seam ripping, even though I meticulously redrew paper pattern blocks to match my measurements, it was not enough of an effort. The skirt initially was too narrow for me around hips. So I had to rip side seams of the main skirt and also the lining and stitch them again at 1 cm seam allowance (instead of 1.5 cm as intended). This fix was necessary though as I definitely wanted to be able to sit in this skirt! 🙂
This skirt is fully lined. It was one of main preconditions in order to make this garment to work, provided how rough and “biting” this wool is. The flounce was lined before attaching it to the main skirt, and the main skirt lining is separate, installed at the waistband.


This skirt is an upcycled jumpsuit and is made in medium weight Yorkshire wool. For this project I loosely used pattern blocks of McCall’s pattern M7994. Notions needed to make this skirt were: some 1 meter of viscose lining, 30 cm invisible zipper, a bit of interfacing for the waistband, a bit of interfacing tape for zipper seams, and coordinating thread. This skirt, again, did not cost me anything as it is an upcycled garment. It was made in August, 2022.

I really like how this skirt turned out! It took quite a bit of work to make it fit me really well. I guess, that’s the deal with all fitted skirts or dresses. But now the hopes are high for it to be worn often. I tried it with few sets of shoes, and liked very much how it looked! And with that I’m opening my autumn-winter season with many more great warm garments to come!
Let it be peace in the world! 💙💛
~Giedre~

Very successful up cycle! I’m amazed at the difference in the overall colour balance made by not have if that red stripe centre front.
LikeLike
Thank you so much, Elle! ❤️ I can only agree. In fact I was quite amazed, too. I remember, when planning the jumpsuit there were not many options how to place that red stripe – it was the most conspicuous color, it had to be centered or symetrically decentered in some way. When I made the jumpsuit, I was very proud of how colors turned out. Now, looking at the picture, I am surprised how I liked it at all. Point of view can change, apparently. And that’s why upcycling is such a satisfying part of sewing!
LikeLiked by 1 person
This is a lovely skirt and a much more practical garment than a jump suit :). Personally, I have never liked skirt waistbands and always construct them with internal, shaped waistbands or grosgrain ribbon, which can be shaped. Alternately, a very narrow bias roll will also finish off the skirt and lining, although I imagine that your fabric would have been too heavy for that. For itchy, scratchy fabrics, another trick would be to cut a waistband so that the exterior is in the wool fabric, but use a cotton for the inside. So essentially , there would be a seam on top of the waistband. Anyhow, all that to say that it is a lovely skirt and to tell you how much I enjoy your blog!
Abbey
LikeLike
Hi Abbey! Thank you so very much for your thoughts and advice! Few of your suggested solutions could have definitelly worked for this waistband. I’ve just learnt one more hack that I could have used (but was unaware of it at the time). I could have steamed and ironed that double-folded straight waistband into a bit concave shape. This way the waistband would not be gaping as it is now. Well, we live, we learn! 😀
I am so glad you enjoy my blog! These words are so sweet and satisfying, that I can’t even tell ☺️
LikeLike